Running individual command at the PowerShell console
is fine, but if you have commands you run regularly, or if you want to
combine multiple commands into a single package, you need to create
PowerShell scripts.
Setting the Script Execution Policy
By default,
PowerShell is configured to not allow any unsigned scripts to run.
That’s a sensible precaution on systems that don’t have a PowerShell
programmer, but that’s not the case on your system. So, you need to
configure PowerShell to allow your own scripts to run, and you do that
by changing the PowerShell execution policy.
However,
only the system Administrator account can change the PowerShell
execution policy. That is, it’s not enough that your user account is a
member of the Administrators group: It must be the Administrator account
itself. Because you change the execution policy at the PowerShell
prompt, you need to open a new PowerShell using the Administrator
account:
1. | Select Start.
|
2. | Type powershell.
|
3. | Right-click
Windows PowerShell in the search results, and then click Run as
Administrator. The User Account Control dialog box appears.
|
4. | Enter your UAC credentials to continue. The Administrator: Windows PowerShell window appears.
|
With your Administrator PowerShell session loaded, enter the following command at the PowerShell prompt:
set-executionpolicy remotesigned
PowerShell displays the following message:
Execution Policy Change
The execution policy helps protect you from scripts that you do not trust. Changing
the execution policy might expose you to the security risks described in the
about_Execution_Policies help topic. Do you want to change the execution policy?
[Y] Yes [N] No [S] Suspend [?] Help (default is "Y"):
Type y and press Enter (or just press Enter) to put the new policy into effect. You can now run your own scripts.
Working with the PowerShell Integrated Scripting Environment
Although you could
easily use Notepad or some other text editor to create your scripts,
you’re much better off using the PowerShell Integrated Scripting
Environment (ISE), which includes programmer-friendly goodies such as
color-coded syntax, breakpoints, stepping through scripts, and more.
To launch PowerShell ISE, select Start, type power, and then select PowerShell ISE in the search results. Figure 1 shows PowerShell ISE with a script loaded.

The PowerShell ISE window is divided into three panes:
Script pane—
This is the top pane, and it’s where you type your script code.
PowerShell ISE automatically color-codes your text to make it easier to
read the code and to help you find errors. For example, cmdlets appear
in blue; variables appear in red; comments appear in dark green; and
strings appear in dark red.
Command pane—
This is the bottom pane, and it works pretty much like the PowerShell
console. That is, you can use the prompt top enter PowerShell commands,
which saves you having to open a separate PowerShell command-line
session.
Output pane—
This is the middle pane, and it’s where PowerShell ISE displays the
output from your script or from the commands you enter into the Command
pane.
Tip
You can switch from one
pane to the other using keyboard shortcuts: Press Ctrl+I to switch to
the Script pane; press Ctrl+D to switch to the command pane; and press
Shift+Ctrl+O to switch to the Output pane.
Running PowerShell Scripts
If
you’re using the PowerShell ISE to compose your scripts, you don’t have
to leave the application to run the current script. Instead, either
click the Run button in the toolbar or press F5. PowerShell ISE runs
that script within the window, and if your script has output, it’s
displayed in the Output pane (the middle pane).
If you’re
running a script from the PowerShell command line, you might think you
can change to the folder where your script resides (using the command cd
path, where path
is the full pathname of the folder), type the name of the script, and
then press Enter. That would be nice, but it isn’t likely to work.
That’s because PowerShell is configured to run scripts only under the
following circumstances:
If you only run the
occasional script and your PowerShell session is currently in your
scripts folder, PowerShell offers a shortcut method for specifying the
full pathname of the script. If you precede the script filename with a
dot (.), PowerShell interprets that dot as the parent folder of the
current folder, so it’s just the same as typing out the entire path.
For example, if you have a script named RegAdd.ps1 stored in the Documents\Scripts folder, you’d normally have to enter the following to run the script (where account is your user account name):
c:\users\account\documents\scripts\regadd.ps1
However, if you’ve got PowerShell in the Scripts folder, you can run the same script using the following command:
On the other hand, if you
run lots of scripts, or if you want to be able to run your scripts from
any folder, you need to add your Scripts folder to the Path variable. Here’s how it’s done:
1. | Select Start, type systempropertiesadvanced, and then press Enter. Windows 7 displays the System Properties dialog box with the Advanced tab displayed.
|
2. | Click Environment Variables. Windows 7 opens the Environment Variables dialog box.
|
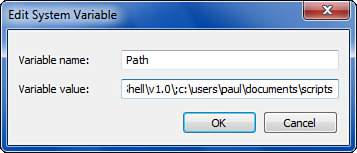
3. | In the System Variables list, select Path, and then click Edit. The Edit System Variable dialog box appears.
|
4. | In the Variable Value text box, move the cursor to the end of the existing value, type a semicolon (;), and then type the full path to the folder where you store your scripts. Figure 2 shows an example.
|
5. | Click OK in all open dialog boxes.
|
6. | If you have a PowerShell session running, shut it, and then restart PowerShell to put the new Path variable into effect.
|